Thursday, 25 February 2021

Where did 7 years go??

 I can hardly believe that so much time has passed without adding anything to my blog! We’ve had a wedding, two grandchildren another engagement and a house move in that time!!

I am determined to do more crafting and will hopefully post much more regularly.

Thursday, 19 June 2014

Sarah's Prom : First page

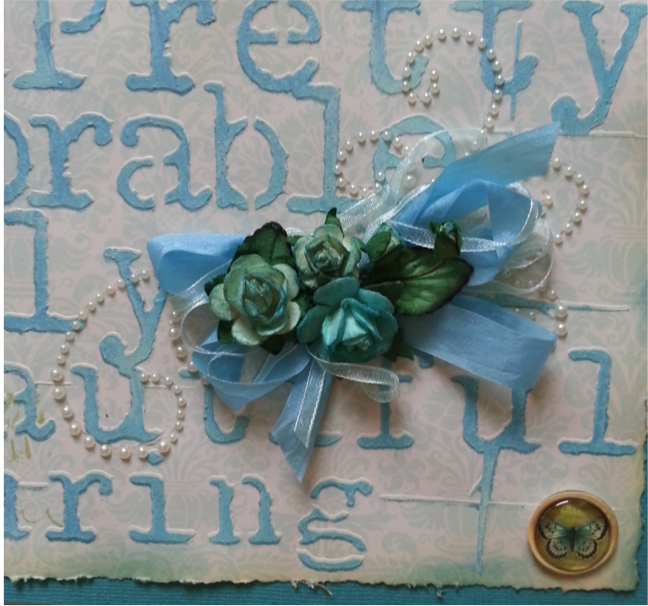
Ok so this is something new for me…using masks and texture paste!!

We were at crop in Stoke Poges run by the lovely Kate from Bellaboo, when I spied a 12 x 12 stencil by Prima with lots of lovely words on it .. …."you could use that on Sarah's prom layout"  
said Tracy ( Craftings my Threrapy)…...

I had printed my picture of Sarah on adhesive photo paper and then cut round her image…I do this a lot!!

I stuck it down on my patterned paper :-Pink Paislee London Market Royal Charm, from Bellaboo as per usual for all my fab papers!! making sure that it was placed to get maximum effect from the stencil.

I placed the stencil, taping it down with a bit of micropore tape, then using my Nectar rewards card and some modelling paste that I got for about £2 from The Works I was off!!…

This was a slightly scary process for me…would I ruin my lovely paper & my beautiful photo…..

no…what a fab result…once the paste had dried I inked with Distress Ink :- Broken China, then when that had dried I layer the stencil back on & spritzed all over with Ranger Perfect Pearls Mist for an all over pearlescent shimmer. 


I distressed the edges of the page and inked with Antique Linen and Broken China Distress Inks. 
Then layered with a plain Bazzil 12 x 12  from Bellaboo


I used one of my usual pearl flourishes from Creative Expressions. 
I coloured my Faux Silk blue ribbon ( Bellaboo) with an aqua Pro Marker to give a better colour match. The flowers were from Hobbycraft, again I used  Broken China Distress Ink to colour them.
 The little round embellishment is from K & Co 
Its a Grand Adhesions Dimensional Sticker by Barbara Walton


This embellishment was a combination of an old K & Co grand adhesion, a pearlised brad and a Wooden ticket from the Prima Zephyr range of embellishments at Bellaboo. 
I had to take  the butterfly off then glue it back on in a better position over the top of the ticket.

All in all I was very pleased with this layout & especially pleased with my first foray into the world of paste and stencils….

Thank you Tracy…I never would have tried this if it hadn't been for your inspiration!!!

I'll definitely be doing some more!!


Sunday, 8 June 2014

Mrs H's birthday card

So this card started life as an a6 size ATC style topper that I made following a tutorial from Tammy Tutterow…..what a fab lady .
Her blog is full of wonderful tutorials and wonderful inspiration!!

Tracy (Craftings My Therapy) is always stamping, dusting & making her own wonderful backgrounds!! I'm more of a patterned paper type of girl but thought I'd have a go at using some of the huge stash of stamps that I own (even though I don't stamp!!!) and get full use of my distress inks, stains and paints.


This is the final card. I added my usual Craft Expressions Pearl flourish.
The background paper was from a 12 x 12 stack from K & Co that I bought  in the USA some years ago….I really am getting good at letting stuff go!! 

( depends who its for of course!!)

The tickets are Tim Holtz I think, inked and distressed of course. 
The ribbon on the topper is my usual faux silk from Bellaboo made on my Bowdabra.

The sentiment comes from a pack that I found in a little craft shop called Craft to the Max in Burnham when on a craft run with Tracy. Sadly the shop has now closed. 

The flower middle is an old earring.

I coloured the flowers and went a bit overboard on the water, & was quite worried about the fact that they had gone a bit soggy and lost their shape but I think the have ended up with a nice vintage look.
The trellis and butterflies are from a  Papermania
scrapbook page border. ( I used the rest on Nellies scrapbook page on an earlier post)


I took a chunk out from the edge of my background paper and slid part of a doily behind it.
I normally put my pearl flourishes behind any embellishments, but this time I went over the top of the tickets, it gives a softer look I think. 


I really enjoyed following Tammy's tutorial and was so glad that I could give Tracy a card that I feel 
I put my heart & soul into. 

xxxx Happy Birthday My Lovely xxxx


Happy Birthday Nicole!!

My sisters twins were 18 on Friday & my niece Nicole had requested that she really would like "one of your nice cards" …how could I resist!!

I had an idea for an "off the page design" something that she really could keep.

I had bought a wooden die cut birdcage from Anna Marie Crafts some time ago………could I bear to part with it?? Of course I could for such a Gorgeous Girlie!!


 First I painted the whole thing with White Distress Paint, probably 3 coats in all.

Then I spritzed the whole Birdcage with Ranger Perfect Pearls in white. Next, I stamped all over with an Indigo Blue background Script stamp in Versa Mark Gold ink.

I cut lots of foliage from my trusty Memory Box Fairytale Border die intermingled with a few Marianne swirls.

I gave them all a light dusting with Peeled Paint Distress Ink.

The roses are all from Hobbycraft.


This number 18 was from a Thickers Alphabet.


I cut the mini rosebud heads off the wires and glued onto the foliage.


The bird was painted and spritzed in the the same way as as the cage was.
I cut a flower into 2 and layered with some green feathers I found in my cupboard.
The flourishes are bits from a couple of Memory Box Bingham Hearts that I had previously cut out in two shades of pink I placed them on the wing to hide an ugly straight edge!!

For the tail I used the remaining bits of feathers and the smallest pre-made rose in my flower box!!


Tah Dah!!!


Thursday, 5 June 2014

Welcome Baby Hollie

Sam & Mels good friends had a baby girl and I offered to do a card……very happy with how this turned out.


Background paper was from Bellaboo -:

Kitschy Kitchen Everything Nice.

The pink mount card and flourishes were Bazzil, the flourishes were cut using my Marianne die.
The baby embellishments were from Hobbycraft I think as were the ribbon roses.
The hearts I cut from the background paper and acetate using an old Sizzix die.
 I hole punched with my Cropadile…….the single most expensive hole puncher I've ever bought!!!

I printed all the info on safmat then stuck it onto the acetate hearts. Inked the edges with Pink Lipstick Distress Ink. Cut the word girl using a sizzles die. Mini paper roses from my stash. I wanted the hearts to dangle so used jump rings & tied ribbon onto them. I fixed the ribbon under mini bows made with my Bowdabra. 


Finally a pink diamante on each heart…..every girl needs a bit of bling no matter how small!!


Mels Aunt 80th Birthday

This was a card for a lady who loved Spring flowers. 

I bought the image from The Old Design Shop on Etsy.
The background paper is K & Co.
Mounts and flourishes assorted bazzil card stock  from Bellaboo.


I used my trusty Spellbinders die…much easier to use since I put some release foam on it for the dark green flourishes on the sides of the picture.
I generally offset these rather than try to match them up and they look wonky!!

The leaves under the bow were from a Memory Box die. The ribbon from a selection bought from Hazel Crafts on e-bay- they do great mixed bags of toning ribbons.

The sentiment is from my now dwindling stash from Craftwork Cards, and I layered it onto some flowers. The pearl edging was bought in the USA some years ago now.


The little embellishment on the bow was an old earring that I cut the back off. 
I really do not throw anything away these days!!.

Fionas birthday card

Time for a card…….
Fiona loves Chocolate and France so I couldn't believe it when I saw this paper from a Papermania  collection…….Mdme Chambourd I think??


My Embellishments are a Creative Expressions metal corner & pearl flourishes. I coloured the flourishes with a Versa mark ink pad to tone them down a bit. 
The flowers were from Hobbycraft, the sentiment from Craftwork Cards, the little round embellishment was K & Co and the metal pin holder is King Tims!!

Nellie….Summer 2013

I've been trying to scrap a bit as well as doing my usual cards. We had taken a lovely picture of our puppy Nellie in the summer last year. I treated myself to Aquarella a fab app on my Apple Mac which turns pictures into watercolours.

I printed her picture onto inkjet canvas stitched around it and generally tried to make it look a bit worn. I inked the edges with Stormy Skies Distress Inks. The letters were Tim Holtz grunge board ones from a huge pack that I'd been looking at in my stash for a long time!!. I painted them with guesso first, then Pickett Fence distress paint, then inked with Stormy Skies and Scattered Straw Distress Inks. I love that when these are all painted up hey almost look like leather……

The background paper was Bo Bunny Country Garden Weathered from Bellaboo.

The tags were from Tracy over at Crafting is my Therapy's stash, the brads bought long ago from I don't know where. 
The butterfly trellis was I think a papermania 12 inch scrapbook border, again in the stash so long that it was no longer sticky and had to be glued on!!!

The Summer 2013 was die cut from grey board using my new Crafters Companion alphabet dies….thank you Sarah…what a fab Birthday pressie!!! Painted and distressed as before.

I was really pleased with how this page turned out even though it had gone a bit wrinkly with using  paint and distress inks on the page to make a frame to mount the picture in.

 As per with me no journalling to speak of on the page but a lovely reminder of how cute our little puppy looked.


April & Eamon Vow Renewal August 2013

A very good friends brother was renewing his vows after 25 years of marriage and the family asked me to make cards. Now they're a large family so I had to make 7 in all. I decided to try and do a variety on a theme. The colour scheme was peach, cream and gold. I found just the paper… Graphics 45 Secret Garden. I had cream pearlised card in my stash and I printed blocks of colour onto the cream card to get all my mounts. All my flourishes are Creative expressions, and all the roses were cut on my trusty Craft Robo and hand coloured and rolled.


This was the fussiest of the cards and the one I enjoyed doing the most as its very me!!
I used my Memory Box heart die, I usually cut a few in co-ordinating colours and layer them, a Spellbinders die for the monogram frame, Creative Expressions pearl flourish and roses cut with the Craft Robo.


This was a frame that I bought from The Silhouette Store. 
 I cut all the roses for the cards in cream pearlised paper and coloured with a Copic marker pen.


 The lacy inserts were my favourite Spellbinders D-lite die. 
Another pearl flourish, and the off cuts from the 12 x 12 paper put to good use for the frame.


 Another Silhouette store purchase for the heart topper. 
I coloured flat back pearls (Hazel Crafts e-bay) with shell pink Adirondak alcohol ink. I used the Metallic Pens with the Craft Robo to write the monogram and date before cutting the file.


This was a rhinestone file bought from the Silhouette Store. 
I coloured the flat back pearls again with the Shell Pink Alcohol Ink.
This was the most time consuming although I think the simplest looking. 
I cut the template using acetate then had to glue each pearl on individually.


Favourite Spellbinders die again offset on each side with hand made and coloured rolled roses.
Sizzix hearts.


You guessed it….another cut file from the Silhouette store. This time I put the monogram and date in the file and used the metallic pens in the Robo to write them on before cutting the file.


I never thought it would be so hard to try and get such a diverse collection together!! I had to dig deep and keep focussed on the fact that not everyone likes a fussy card and sometimes less is more!!

They all loved their cards and a great day was had by all….what more can you ask for. xx


Well Thought I'd put the very few bits and pieces I'd made onto the blog and I simply can't believe that my last post was in July 2013 almost a year has gone by without any creating…..mind you Ian (my Hubby) did have a catastrophic injury to his hand last November and its taken us until March this year to get back to anything like normality, add to that the fact that I no longer have dedicated craft space….I think you get the picture!!…Any way enough rambling and on to the "art".

Wednesday, 24 July 2013

WOYWW

Thought I'd post simply because I have something on my desk to show!!! Making cards for Claires family wedding....well not much NOT on the desk....ribbon, glue, bling, card, paper, cropadile, bow maker, bow dabra, ruler, glossy accents, pva, metal dies!!!


Monday, 22 July 2013

Flower Show Challenge


Hi bloggers ..not posted for a while but sometimes the creative juices run dry....its as simple as that!!
My latest creation was using the Prima Engravers paper and embellishments from Bellaboo.
I really wanted to use these papers but wasn't sure what to do with the picture once I'd finished it...then eureka...a handsome gift for my good friend Tracy over at Craftings My Therapy....hope she likes it!!
I started off with a canvas picture, I took the picture off and was left with a frame which I  covered with bits of masking tape and distress inked, then sealed  with matt accents. 
(I got this technique from you tube..Cari Masciangioli.)

I started with two sheets of 12 x 12, used one for the base, then cut out the two main flower pictures from the second.

I highlighted parts of the flowers using Flitter glue and gilding flakes, then used glossy accents on the stems.

The next step was to mount the pictures on chipboard to make them more substantial, then distress and ink the edges , for the main picture I added a couple of corners from Creative Expressions, and use some foam pads to raise it off the page. I have used the Memory Box Fairy Tale Flower Border die to make the edging. The other picture I stuck back on flat to the page as it was going to be partially covered with flowers.

Lots of flowers and a bit of bling all from the Prima Engraver range


I printed this quote ( from the internet) onto paper and cut, distressed and inked to size to cover part of the paper that didn't really go with the theme ( a dollar bill). I then Distress crackle glazed to add a different texture.

Friday, 31 May 2013

The Grandog

We've been looking after the Grandog last week whilst Sam & Mel have been in Mexico....
we have enjoyed having Bella around the last 10 months soooo much that we
now have a little one of our own....everyone I'd like to introduce

 Bella and Nellie.

Bella....nearly a year old!!

Nellie....10 weeks old!!

Its been a while....... Tracys Birthday Card

Well its certainly been a while since I posted anything, but then its been a
 while since I've done anything!!! 

My room is such a mess I am finding hard to get any enthusiasm about either clearing it 
out or creating anything for that matter!!!

Anyhow it was my lovely friend Tracy's birthday on Tuesday and I grabbed all my glues and papers and headed for the kitchen table to do this one!!

I wanted to do her a hinged card ( The Gentleman Crafter ) but as usual to get
 everything on, I had to do an 8 x 8 card.
I had previously bought 8 " lolly sticks when in Florida earlier this year for just such an occasion!!


Card Front

Inside

Back

Bling!! (Hazel's Crafts E-bay)

Flowers

I used a 12 x 12 sheet of Prima Nature Garden ( Bellaboo) for the front and back of the card.
I had covered my chipboard with some Craftwork Cards card stock (can't remember the colour)
Then after stitching around the edges of the front and back patterned paper pieces,
I distressed and inked them with Tattered Rose Distress Ink
( thank God for King Tim!!)

The hinge sticks I coloured using Tattered Rose Distress Ink, being paper covered they took the colour really well, much better than wooden kebab sticks albeit a little heavier, but with the size of the card I think it can take it!!


I have recently bought some Memory Box Dies from Craft Obsessions in the sale....excellant value, fast delivery!!...
 and cut about 6 of the Fairytale Flower Border, distressed them with Tattered Rose
 and added a little Broken China to pickup the aqua in the paper.

These dies are absolutely fabulous...I have terrible trouble with the Spellbinders D Lites.... I like the really detailed dies...and can never get them out of the die despite rubbing with tumble drier sheets, cutting with greaseproof paper..........anyway I digress....if you haven't already, try these dies, they are brilliant!!!

I found some tiny pink diamantes in my stash for the flower centres, then made some tiny ribbon bunches ( Hazel's Crafts E Bay) to dot here and there. The flowers were Prima Nature Garden from Bellaboo. The sentiment was again  from Craftwork Cards.

For the hinges I managed to cut the end using a bit of a Spellbinder die set, I put the end I wanted to cut under the die and threaded the rest of the card back through over the top ( the die was a square) not sure if I've explained that enough...but if you have a go you'll see what I mean!!

 For the inside I used a 6x6 Nature Garden paper stack( Bellaboo)
Found a lovely Friend phrase on the web,  printed onto pearlised paper ....a freebie from Crafters Companion when I used to buy CD's!!! and Voila!!!

Friday, 19 April 2013

Hi Tracy

Just wanted to say Hi Tracy, cant get into the comment area on your blog!!!
(no probs your end its me cant remember a password!!)

 
Your cards are as usual Mrs H fab!!
 Love Love Love the stamped card for your sis in law....
I feel an afternoon tutorial coming on when I return!!

Soooo glad you are feeling better, am off to Michaels this afternoon.......
hopefully get some bounty today!!

xxxxxxxx

Hinged Birthday Card for Lesley

Finally I can post the finished article from my
 WOYWW from a couple of weeks ago!!

Thanks again to The Gentleman Crafter for clear instructions on the hinged card.


Lesleys favourite colour is blue so I dug out a sheet of my beloved K & Co paper
that I was hanging on to ( as you do!!) only 1 sheet left!!

It's already lovely and sparkly so I added a pearl flourish from Creative Expressions,
 a Blue Faux Silk bow made with ribbon from Bellaboo, backed with some Tulle also Bellaboo
 ( don't know what I'd do without my mini Bow Dabra!!)

Sentiment is Craftwork Cards, and just a tiny 60 to mark the occassion.
I coloured my kebab sticks with a versa mark mini ink pad.
These did keep splitting at the ends so I have invested in some
lolly sticks to try, they are a bit fatter but will hopefully still work.


Friday, 12 April 2013

Altered Cracker Box

More pictures from the camera in the cupboard, 
this time a Carr's Cracker box that I altered to store my sewing machine bits & bobs in 
(bobbins, feet,oil etc). 
This time I used a wrapping paper from Paperchase, 
made my own tape (impressed??) 
using Micropore tape from Tesco at 50p a roll!! Inked and stamped,
then added some Tim Holtz corners, a faux lock and key. 
I picked up the mini cotton reels at the NEC a year or so ago but can't remember who from!!


Kaisercraft Cuckoo Clock

Just found these pictures of a clock that I altered,
 I think I used Prima :Nature Garden papers and flowers ( Bellaboo). 
The leaves were from a cricut cartridge cut in bazzil.
 I inked the sides, the fence and the weights, with an individual memento ink pad and distress inks.
The chain is from a cheap necklace that I had kept and
the birdcage and bird charms were from a kit I bought at Bellaboo. 


The pictures just don't do this justice, it looks really good
even though I say so myself!!

Wednesday, 10 April 2013

WOYWW

Well the desk looks a little different this week,
( still no further on with the bottle!!)
I am having a go at making a hinged card 
as shown by The Gentleman Crafter on his blog!!


I have finished the basic card and am now at 
for me the most painstaking bit.......
decorating it!!

Wednesday, 3 April 2013

Shoppings arrived!!

Had a bit of a low day last week and now all the goodies have started to arrive.... 
you know what it's like!!

Some Sizzix dies: a Tim Holtz Alterations one, On the Edge Distressed Doily
...just for Mandy!!

A bird die that comes with an embossing folder, some leaves for filling in small gaps
on my cards and some beautiful wings.

Hopefully they'll be on my desk by next Wednesday for the WOYWW challenge!!

Kate at Bellaboo has also set us a challenge to alter a peg for the next crop
........  they've also arrived. 

Better stop buying and start crafting.

Oh did I mention that I spent the last of my birthday money from my son on a 
Ranger Melting Pot..... I do love a gadget!!